Connect with Home Server Remotely via Tailscale

For the past few months, I’ve been building a home NAS for my family, mainly to store the terabytes of photos we have lying around in different hard drives all over the place. I’ve always wanted a place to store/backup all my university and work-related files too, and setting up this home server solved all my needs.
However, while everything works fine when I’m under the same local network, it would be nice if I have access to my network drives when I’m outside at work, and even better when I can backup my photos while I’m on vacation somewhere else.
In this post, we’ll go over how to remotely access your home server (Unraid, in my case) from anywhere in the world using Tailscale VPN. Jump straight into the guide here.
Cybersecurity and Accessibility
Typically at your home, everything is connected to the wifi on your router, also known as the local network. Unless you specifically contact your ISP (Internet Service Provider) to open certain ports in your firewall (even if you do so, most ISPs won’t allow it), outsiders can’t connect directly with your IP address in the local network, making devices in your network safe, but at the same time, isolated.
The truth is, that not exposing your home IP to the public internet is often a good idea. There are tens of thousands of attackers lurking in the dark waiting to launch an attack, scanning the internet for vulnerable ports and addresses. The best way to protect your server and assets is to simply never expose yourself to the public network. There is a tradeoff between security and accessibility.
Whoever names me, breaks me. The solution is, of course, ‘silence’. But the truth is, anyone who knows your name can break you in two.
~ Carmen Maria, In the Dream House
But what if I want to access my server from outside?
This largely depends on your needs. If what you are looking for is a way for any users on the internet to access your service, for example, a website, then a reverse proxy is probably what you want.
Reverse Proxy
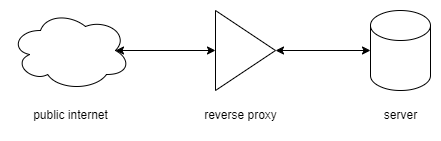
reverse proxy architecture
A proxy, as the name suggests, is a service standing in the middle between your server and the public internet. It essentially acts like a “guard” for your server, preventing unwanted visitors from accessing, while forwarding messages between the client and the server. You can even set up firewall rules on the reverse proxy to manage security permissions.
You can run a reverse proxy using something like NGINX, and use a tunneling service such as Cloudflare Tunnel to hide your IP and ports for even better security.
I plan to write a more detailed guide about how to set this architecture up on a home server in the future.
If, however, what you are looking for is a way to securely connect between known devices (no outside visitors like a website does), then you are probably thinking about a Virtual Private Network (VPN).
Virtual Private Network (VPN)
I want a way to remotely access my home server from my laptop, and for my family members to connect to the Immich instance (A self-hosted Google Photos replacement, highly recommend!) running on the server for photo backup from their phone. In this case, all the devices (phones, tablets, laptops) are already known, so a better option would be to set up a VPN.
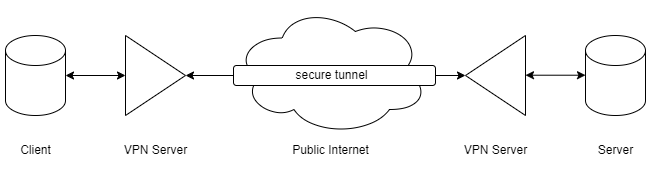
virtual private network (vpn) architecture
In a VPN architecture, all devices are connected through the internet to the VPN service provider, which then provides a secure tunnel for the devices to talk to each other over the public internet. All device that connects to the VPN server has to be registered by you, thus eliminating any external threats on the public internet. It is essentially your own “private network” over the internet, thus the name virtual private network.
We’ll look at how to easily set up a VPN for free via Tailscale in the next section.
Setting up VPN via Tailscale
At the time of writing this post (June 16, 2024) Tailscale offers up to 20 connected devices for free using their VPN service. Which is honestly more than enough.
To get started, you’ll need to register for an account on Tailscale.
Next, we’ll have to add the devices to our VPN.
Since my server is running Unraid OS, I downloaded dsmith44’s Tailscale docker image from the community app store. Skip directly to step 2 if you are running other mainstream OS (Windows, Mac, Linux…)
Step 1: Install Tailscale on Unraid

I left most of the settings untouched, except for providing an optional flag to set my Unraid server as an exit node.

Save and apply the settings, and wait for the docker image to install. Once finished, go to the docker logs and you should see a Tailscale URL. Paste it in your browser and it should prompt you to add your Unraid server to the VPN.
Next, we’ll have to add the Tailscale network interface to unraid. Go to Settings -> Network Settings, find the “Interface Extra” section and add “tailscale0” to the include listening interfaces. Click apply to save changes.

This extra network interface we just added will have to be re-applied after every reboot. To automate this process add the following script into /boot/config/go.
### tailscale
# reload services after starting docker with 20 seconds grace period to allow starting up containers
event=/usr/local/emhttp/webGui/event/docker_started
mkdir -p $event
cat <<- 'EOF' >$event/reload_services
#!/bin/bash
echo 'sleep 20;/usr/local/emhttp/webGui/scripts/reload_services' | at -M now 2>/dev/null
EOF
chmod +x $event/reload_services
For the final step, run this script in the terminal to allow port forwarding.
echo 'net.ipv4.ip_forward = 1' | sudo tee -a /etc/sysctl.conf
echo 'net.ipv6.conf.all.forwarding = 1' | sudo tee -a /etc/sysctl.conf
sudo sysctl -p /etc/sysctl.conf
Step 2: Install Tailscale on other devices
To add other devices to your VPN, simply click “add device” on your Tailscale home page and follow the steps to download the device-specific client.

Besides my Unraid home server, I also have my phone and laptop on the network. You can also share your devices on the network with another person using Tailscale, like how I shared my home server with my brother.

That’s it!
On Tailscale you can see that each of your devices is assigned a unique IP address. While you are on the VPN, you can communicate with the connected devices through that assigned IP, no matter where you are in the world.
This is by far the easiest way to set up remote access to a server back home while ensuring maximum security. Definitely, something for me to keep in mind for future projects.